Feeds:
Posts
Comments

In this article, I will take you through the creation of a streamlined Continuous Deployment pipeline. This pipeline is designed to streamline the process of uploading version-controlled artifacts to a designated AWS S3 bucket, ultimately reducing the time it takes to receive feedback on code changes made to your codebase.

The Power of a Simple Shell Script: Automating AWS S3 Uploads

As a DevOps engineer, you’re often faced with the challenge of deploying code and artifacts to different environments. With the increasing popularity of cloud computing, many engineers are using AWS S3 as a cost-effective and scalable solution to store and manage their artifacts. However, uploading files to S3 can be a time-consuming process, especially when you need to test changes in lower environments.

Enter the Shell Script: a powerful tool that can help automate this process and save you time. In this blog post, we will be discussing a script that automates the uploading of artifacts to AWS S3. This script is a great example of a “poor man’s CI/CD pipeline” and can be a valuable tool for any DevOps engineer looking to streamline their deployment process.

How it Works

The script is written in bash and makes use of the AWS CLI to upload files to S3. It accepts file extensions as parameters and uploads all files with the specified extension in two local directories, dir1 and dir2, to the specified S3 bucket and location. The script also checks if the AWS CLI is installed and provides an error message if it is not.

The script also includes a feature to upload all files if “all” is provided as the only parameter. However, if “all” is provided along with other file extensions, the script will throw an error message. The script also has the capability to checkout a specified branch before uploading the files, with a default branch of “master” if no branch name is provided.

Customizability

One of the biggest advantages of this script is its customizability. By changing the values of the bucket_name and s3_location variables, you can easily specify the S3 bucket and location you want to upload your files to. Similarly, you can change the values of the dir1 and dir2 variables to specify the local directories you want to upload files from.

Time-Saving Benefits

This script saves time by automating the process of uploading files to S3. Instead of manually uploading files each time you make changes, you can simply run this script and have your files uploaded in a matter of seconds. This is especially useful when testing changes in lower environments, where you need to quickly deploy and test your code.

Cost-Effective Solution

The best part about this script is that it is free of cost and doesn’t require any proprietary software or cloud instances. All you need is a computer with the AWS CLI installed and you’re good to go. This makes it a cost-effective solution for any engineer looking to streamline their deployment process.

Conclusion

In conclusion, the script provided is a great example of a simple yet powerful tool that can help automate the process of uploading files to AWS S3. Its customizability, time-saving benefits, and cost-effectiveness make it a valuable tool for any DevOps engineer looking to streamline their deployment process. Whether you’re looking to use it as a “poor man’s CI/CD pipeline” or simply as a way to quickly test changes in lower environments, this script is a great starting point for automating your deployment process.

#!/bin/bash
# AWS S3 bucket and location
bucket_name="<bucket-name>"
s3_location="<s3-location>"

# Local files location
dir1="<directory-path-1>"
dir2="<directory-path-2>"


# Check if the AWS CLI is installed
if ! command -v aws > /dev/null 2>&1; then
  echo "AWS CLI is not installed. Please install it and try again."
  exit 1
fi

# Function to upload files to S3 based on file extensions
upload_to_s3() {
  local dir=$1
  local extension=$2
  for file in $(find $dir -name "$extension"); do
    filename=$(basename $file)
    aws s3 cp $file s3://$bucket_name/$s3_location/$filename
    if [ $? -eq 0 ]; then
      echo "Successfully uploaded $filename to S3."
    else
      echo "Failed to upload $filename to S3."
      exit 1
    fi
  done
}

# Checkout branch
echo "Checking out specified branch..."
branch_name="<branch-name>"
if [ -z "$branch_name" ]; then
  branch_name="master"
fi
git checkout $branch_name

# Main program
if [ $# -eq 0 ]; then
  echo ""
  echo "Error: At least one file extension or 'all' must be provided as a parameter."
  echo "Usage: ./script_name.sh [file_extension1] [file_extension2] ... [file_extensionN] OR ./script_name.sh all"
  echo ""
  echo "Welcome, your files are important. Try again with the correct parameters."
  exit 1
elif [ $# -eq 1 ] && [ "$1" == "all" ]; then
  # Upload all file extensions if 'all' is provided as the only parameter
  upload_to_s3 $dir1 ""
  upload_to_s3 $dir2 ""
else
  # Upload files based on file extensions provided as parameters
  for extension in "$@"; do
    if [ "$extension" == "all" ]; then
      echo "Error: 'all' cannot be used together with other file extensions."
      echo "Usage: ./script_name.sh [file_extension1] [file_extension2] ... [file_extensionN] OR ./script_name.sh all"
      exit 1
    fi
    upload_to_s3 $dir1 ".$extension"
    upload_to_s3 $dir2 ".$extension"
  done
fi

mongoDB
With some applications, there may be a need to pull data from other database instances, or from other databases within the same instance.  Often this can be achieved by having multiple connections from your application pointing to each of these data sources. This is great for this one application, but if there is a need to do this within the database instance or for stored procedures or views then we will generally use full part naming convention in RDMS world.

For example, SQL Server offers the functionality to reference objects within the database you are working or to reference objects in another database or even a different instance of SQL Server.  This is referred to as four-part naming.  The reason for this name is that there can be four parts that are used to reference the object as the following shows:

server.database.schema.object

or we can also reference the database that the object resides in such as

select * from master.dbo.sysdatabases

A similar approach in MongoDB is to use db.getSiblingDB() database method and looping for each database. This is loosely analogous to the undocumented Stored Procedure in SQL Server called sp_MSforeachdb which is quite handy when you do not want to use cursors. You can use db.getSiblingDB() as an alternative to the use helper. This is particularly useful when writing scripts using the mongo shell where the use helper is not available. To expand on that, I have written a simple script that will loop through all the databases with the instance and then use db.getCollectionNames() method to access Collections within each database.

  • Main Code –
var sleepBetweenDBs =   sleepBetweenDBs || 400;
var sleepBetweenBatches =  sleepBetweenBatches || 1000;
var batchsize = batchsize  || 50
var _dbsPath =  "/path_to_dblist/db_list.js"

//	LIST DBs 

load(dbsPath)
var dbsToProcess = JSON.parse(dbs);
dbcount = dbsToProcess.length
print ("Database count " + dbcount)
print("Databases being processed in this run are as below - ")
printjson(dbsToProcess)

//   Main script entry

dbsToProcess.forEach(function(database)	{
db = db.getSiblingDB(database);
if (db != 'local' && db !='admin')
	{
	var collections = db.getCollectionNames();
	print('Collections inside the db:');
	for(var i = 0; i < collections.length; i++)
		{
		  var name = collections[i];

		  if(name.substr(0, 6) != 'system' )
		  // Write your own query here.
		  // Prints the count of documents inside each collection

			print(db + ' | ' + name + ' | ' + db[name].count()); 

		}
	}
});

  • Executing the above script –

You can directly call the .js file from mongo shell as below, and mongo will execute the JavaScript directly.

  • Example –

mongo.exe -u username -p password server[:port]/AdminDB  --eval "var sleepBetweenBatches=1000" main.js<span id="mce_SELREST_start" style="overflow:hidden;line-height:0;"></span>

  • Git Repository –

github_hgottipati_mongodb_repository

The benefits of running databases in the AWS are compelling but how do you get your data there? In this session, we will explore how to use the AWS Database Migration Service (DMS) to migrate on-premise SQL Server tables to DynamoDB in AWS at a very high level.

I will write up a follow-up blog post focusing on the nitty-gritty details of this migration. Until then, happy cloud surfing 🙂


This slideshow requires JavaScript.


In the big-data ecosystem, it is often necessary to move the data from Hadoop file system to external storage containers like S3 or to the data warehouse for further analytics. In this article, I will quickly show you what are the necessary steps that need to be taken while moving the data from HDFS to S3 with some tips and gotchas. In a later article, I will write about moving the same data from S3 to Redshift which is mostly straightforward as long as we have the data prepped up correctly for the date warehouse injection.


HDFS Source Directory

hdfs://hadoopcluster.com:9000/data/hive/warehouse/testdb.db/
mapping_analytics_data

HDFS Source Table (optional)

testdb.mapping_analytics_data

HDFS (State directory)

hdfs://hadoopcluster.com:9000/data/test/mapping_analytics_historical.db

S3 Bucket Location

s3://hdfs_bucket/mapping-data/


Step 1: Data preparation in HDFS


Data preparation at the source is required so as to make sure there that there are no issues loading the data eventually into Redshift tables. This step is not crucial if you have plans to station this data only in the S3 storage with no goals of copying it to a data warehouse. The reason being is that the Redshift (or any RDBMS tables in that respect) can be very picky about the format of the data, so this script should get the data into a state that Redshift (or any RDBMS) is happy with. Also once the data is in storage container it is almost always an uphill battle to make any changes (esp the one that relates to the schema) at that time than when the data is still on HDFS. This is also the time when you architect and design your data warehouse tables that are ready for data injection.

Most of the issues that I faced during the S3 to Redshift load are related to having the null values and sometimes with the data type mismatch due to a special character. To transform the data I have created a new directory in HDFS and used the INSERT OVERWRITE DIRECTORY script in Hive to copy data from existing location (or table) to the new location. If you rather need the data moved to a Hive table instead of a directory you can either useINSERT OVERWRITE TABLE or just create an external table over the new data directory. See,  Writing data into the filesystem from queries

Here are some of the configurations that I have used to make the process easier.

  • Used Spark on Hive to utilize Apache Spark as the Hive’s execution engine for faster execution. You must have Spark installed on your cluster to make this work but you do not have to use it. More info here
  • Utilized Gzip compression to help with faster network copy and saves space in S3 bucket
  • NULL values are replaced with blank strings or other literals by using nvl function 
  • Removed Hypens in the date column using regexp_replace function.


-- ## Transformation and Insert Script within HDFS ## --
-- enable compression and set engine to use spark execution
--
--
set hive.execution.engine=spark;
set mapred.reduce.tasks=1;
set mapred.output.compress=true;
set mapred.output.compression.codec=org.apache.hadoop.io.compress.GzipCodec;
set io.compression.codecs=org.apache.hadoop.io.compress.GzipCodec;
set hive.exec.orc.default.compress = gzip

set hive.msck.path.validation=ignore;
MSCK REPAIR TABLE unid_mapping_analytics_pyspark;

-- write to directory
INSERT OVERWRITE DIRECTORY "hdfs://hadoopcluster.com:9000/data/TEST
/mapping_analytics_historical.db/dt=${hiveconf:DATE_PARTITION}"
  ROW FORMAT DELIMITED
    FIELDS TERMINATED BY "\t"
      STORED AS TEXTFILE
--
--
SELECT
    NVL(regexp_replace(date,'-',''), ""),
    NVL(source, ""),
    NVL(dimension,""),
    CAST(NVL(value, "0") as bigint)
FROM
    testdb.mapping_analytics_data
WHERE
    rec_date = "${hiveconf:DATE_PARTITION}"
--
--


Here is the Hive query to invoke the above script using the command line. Note the -f option where you will provide the above insert script and I have used -hiveconf to pass the date parameters. Have to run this from the hdfs cluster which can access the old and new hdfs location. See, Hive Batch Mode Commands


/usr/bin/hive -hiveconf "DATE_PARTITION=2017-11-02" \
 -f $HIVE_SCRIPTS/stage_HDFS_Insert.sql 2&amp;1 \
 tee ${LOG_FILE_PREFIX}-stage_hdfstoS3.log

Step 2: HDFS to S3 Migration


Finally, we will move the cleansed data to S3 using the DistCp command, which is often used in data movement workflows in Hadoop ecosystem. It provides a distributed copy capability built on top of a MapReduce framework. The below code shows copying data from HDFS location to the S3 bucket. 


##
/opt/hadoop/bin/hadoop distcp hdfs://hadoopcluster.com:9000/data \
/TEST/mapping_analytics_historical.db/dt=2017-11-02/* \
 s3a://$AWS_ACCESS_KEY:$AWS_SECRET_KEY@hdfs_bucket/mapping-data \
/dt=2017-11-02\
$LOG_DIR/mapping-log-$DATE_PARTITION.log 2&amp;1
##


Note: S3DistCp is an extension to DistCp that is optimized to work with S3 and that adds several useful features in addition to moving data between HDFS and S3. 


Screen Shot 2017-11-06 at 10.54.34 AM


From the above snippet note that I have multiple files in the S3 container. Although it is not a requirement it is usually a best practice to have multiple files in distributed systems. In my case, the Spark execution engine automatically splits the output into multiple files due to Spark’s distributed way of computation.

If you use hive (mapreduce only) and want to move the data to Redshift it is a best practice to split the files before loading to Redshift tables as the COPY command to Redshift loads data in parallel from multiple files using the massively parallel processing (MPP) architecture. If you loading data from a single large file, Amazon Redshift is forced to perform a serialized load, which is much slower. See more on this, Loading data from Amazon S3

I know we are living in a world where phones and other devices with advanced biometric authentication have been increasingly becoming a norm. Apart from the tremendous convenience they offer, they also offer the highest level of security with no longer needing to type in a passcode and worrying about someone watching us over the shoulders. It should be the same with the databases that store our most valuable and secure information. In this article, I am going to show you how we can achieve that in a Redshift database hosted in Amazon cloud.

Commonly, Amazon Redshift users log on to the database by providing a database username and password or use a password file (.pgpass) in the user’s home directory with psql queries. Both these options require you to maintain passwords somewhere which is not always the best way to do. To better manage the access as an alternative to maintaining these credentials we can configure our systems to permit users to create user credentials and log on to the database based on their IAM credentials on the go.

Amazon Redshift provides the GetClusterCredentials API action to generate temporary database user credentials. We can configure our SQL client with Amazon Redshift JDBC or ODBC drivers that manage the process of calling the GetClusterCredentials action. They do so by retrieving the database user credentials and establishing a connection between your SQL client and your Amazon Redshift database. You can also use your database application to programmatically call the GetClusterCredentials action, retrieve database user credentials, and connect to the database.

Create an IAM Role or User With Permissions to Call GetClusterCredentials

Our SQL client needs permission to call the GetClusterCredentials action on our behalf. We manage those permissions by creating an IAM role and attaching an IAM permissions policy that grants (or restricts) access to the GetClusterCredentials action and related actions.

Create an IAM user or role.

Using the IAM service, create an IAM user or role. You can also use an existing user or role. For example, if you created an IAM role for identity provider access, you can attach the necessary IAM policies to that role. I have used an existing role for my test but here is how to create a new user if you need to.

Go to IAM service in AWS Portal and click on Add user

Picture2

You can either choose Programmatic access or AWS Management Access.

Create and attach a policy to the above user

Picture3

Go to Policies and click Create Policy

Picture4

I picked ‘Create Your Own Policy’ so I can copy paste the below code. But you can let AWS create one for you if you choose ‘Policy Generator’

Picture5

Once you have the Policy Document validate it for any errors and then click ‘Create Policy’

Copy paste the below policy document into the above screen. Make sure to update the “Resource” field for your service. See naming convention for Resource ARN for Redshift here


{
    "Version": "2012-10-17",
    "Statement": [
    {
        "Sid": "Stmt1510160971000",
        "Effect": "Allow",
        "Action": [
          "redshift:GetClusterCredentials"
         ],
        "Resource": [
            "arn:aws:redshift:us-west-2:1234567890:dbuser:datag/temp_creds_user",
            "arn:aws:redshift:us-west-2:1234567890:dbname:datag/dataguser"
         ]
     }
  ]
}


Attach the above policy

Once you create a new policy, now attach that to the user as below. This is like providing the user with the required privileges.

Picture10

Click Add Permission

Picture9

Select the attach policy

Picture8

Click apply permission

Create a Database User and Database Groups

You can create a database user that you use to log on to the cluster database. If you create temporary user credentials for an existing user, you can disable the user’s password to force the user to log on with the temporary password. Alternatively, you can use the GetClusterCredentials Autocreate option to automatically create a new database user.

create user temp_creds_user password disable;
create group auto_login_group with user temp_creds_user;
grant all on all tables in schema public to group auto_login_group;

Picture6

Use admin password to run the above queries in SQLWorkbench

Connecting through SQL Client Tool – Configuring JDBC connection

You can configure your SQL client with an Amazon Redshift JDBC (or ODBC) driver that manages the process of creating database user credentials and establishing a connection between your SQL client and your Amazon Redshift database.

Download the latest Amazon Redshift JDBC driver from the Configure a JDBC Connection page.

Important: The Amazon Redshift JDBC driver must be version 1.2.7.1003 or later.

Create a JDBC URL with the IAM credentials options

jdbc:redshift:iam://examplecluster.abcd1234.us-west-2.redshift.amazonaws.com:5439/temp_creds_user;

In SQLWorkbench URL field use the below connection string

jdbc:redshift:iam://examplecluster.abc123xyz789.us-west-2.redshift.amazonaws.com:5439/dbname?AccessKeyID=abcd&amp;SecretAccessKey=abcde1234567890fghijkl

Add JDBC options that the JDBC driver uses to call the GetClusterCredentials API action. Don’t include these options if you call the GetClusterCredentials API action programmatically. From the below screenshot from SQLWorkbench, you will notice that the connection is successful even without providing a password. 

Picture7.png

Connecting through Redshift CLI or API – Generating IAM Database Credentials

To generate database credentials you need to run the below redshift CLI command with your cluster name and the username created above.

aws redshift get-cluster-credentials --cluster-identifier exampleCluster --db-user temp_creds_user --db-name birch --duration-seconds 3600</pre>

Below is an example output showing the database password generated on the fly that can be used for logging into redshift using PSQL commands. You can easily automate this command in bash to store the generated password in a file and supplying that file for logging in so as to eliminate the copy and paste work.

Picture8.png

Picture11

Supply the returned password using psql command to log in

Happy coding!

Using SSH keys provide a more secure way of logging into a remote computer when compared to password authentication, and today I will walk you through how we can achieve this in 3 simple steps

For this demo I will be configuring SSH key authentication for the user account accountsguru to connect to the remote system mylinuxlab.net, accessing remotely from my local computer sraavi.

  • user account: accountsguru
  • local computer: sraavi
  • remote system: mylinuxlab.net

Prerequisite: User accountsguru must be having an account already existing in the remote system mylinuxlab.net and authorized to access remotely.

Step1: Generate SSH public-private key pair

Logon to the local computer with the user account for which we want to create the SSH key pair, and run the following command

ssh-keygen

Below is the output generated. If you watch closely, in line 3 we are prompted to chose a directory and I accepted the default here, and in the next line we are prompted to enter a passphrase, which is to protect your private key. Passphrase adds an additional security layer because if in case a hacker got access to your private key he/she won’t be able to make any use as the private key is passphrase protected. Since we are doing a demo here I skipped the passphrase

[accountsguru@sraavi ~]$ ssh-keygen
Generating public/private rsa key pair.
Enter file in which to save the key (/home/accountsguru/.ssh/id_rsa):
Enter passphrase (empty for no passphrase):
Enter same passphrase again:
Your identification has been saved in /home/accountsguru/.ssh/id_rsa.
Your public key has been saved in /home/accountsguru/.ssh/id_rsa.pub.
The key fingerprint is:
7b:54:3e:f8:33:31:8e:70:81:f1:a3:4d:e2:52:c3:0b accountsguru@sraavi
The key's randomart image is:
+--[ RSA 2048]----+
| . |
| . + |
| E * = . |
| + B * |
| . S = = |
| . = + + |
| . o = |
| . o |
| |
+-----------------+

From the output above, line 6 is our private key, and line 7 is the public key.

Step2: Copy the public key to the remote system

Now, copy the public key from your local computer to the remote system using the below command

ssh-copy-id accountsguru@mylinuxlab.net

Note that it will prompt to enter the password to access the remote computer, and here is how the result looks like

[accountsguru@sraavi ~]$ ssh-copy-id accountsguru@mylinuxlab.net
/bin/ssh-copy-id: INFO: attempting to log in with the new key(s), to filter out any that are already installed
/bin/ssh-copy-id: INFO: 1 key(s) remain to be installed -- if you are prompted now it is to install the new keys
accountsguru@mylinuxlab.net's password:
Number of key(s) added: 1

From the above two steps we’ve successfully generated key pair and configured the user account accountsguru to access remotely using SSH

Step3: Connect to the remote system using SSH

Now let’s try logging into the remote server using SSH with the following command

ssh accountsguru@mulinuxlab.net

And, here is how it looks after making a successful connection..

[accountsguru@sraavi ~]$ ssh accountsguru@mylinuxlab.net
Last login: Fri Dec 9 19:28:33 2016 from 172.110.22.205
[accountsguru@mylinuxlab ~]$

To exit the remove server you can press tilda followed by dot (~.) and usually we won’t see the characters when we type them, but the session will terminate immediately

[accountsguru@mylinuxlab ~]$ Connection to mylinuxlab.net closed.

Hope this helps! If you have any feedback or a question, please leave it in the comment section below.

In this post, let’s learn how to use chgrp and chown commands to change group and user ownership of a directory

On a Linux server, by default, the group owner of a file or directory is the primary group of the user who created the file directory. And it is highly likely in most cases the primary group and the user share the same name

Let’s say we need to change the group and user ownership of the directory /home/chris/mars to root user, below are the steps we need to execute

Step1: Switch to root user

#switch to the root user
su - root

Note: In order to change the group owner of a file or directory, one must be the user owner of the file AND be a member of the group to which we are changing ownership or else be the root user. Also, remember that only the root user can change the user ownership of a file or directory.

Step2: Use chgrp to change the group owner and chown to change the user owner

#Using chgrp to change the group owner
chgrp root /home/chris/mars
#Using chown to change the user owner
chown root /home/chris/mars

OR
Step3: Use chown to change both group owner and user owner at the same time

#using chown to change both group and user owner at the same time
chown root:root /home/chris/mars

Here’s a bonus tip for you: The process to change group and user ownership on a file is the same as performing the commands on a directory, making our job easy!

We are happy to announce the birth of DataGinger. Starting today we officially re-branded ourselves as DataGinger.com (previously SQLServerZest.com). The main motive for this change is to expand our blogging topics beyond SQL Server and widen our scope to include all data and supporting technologies.

Enjoy learning!

-Your Friends at DataGinger

Disk space is one of those things that frequently runs out of space no matter how much you bump it up irrespective of the service you are running in the server. I know storage is cheap but who wouldn’t want to keep an eye on what’s cooking especially when it has the potential to bring things to halt?

I believe that if you run a Windows Service, or if anything Windows is your job, then implementing PowerShell will make your job a lot easier and lot more fun. This PowerShell script calculates free disk spaces in multiple servers (from a text file) and emails the report in a HTML format. The script can be scheduled using Windows Scheduler or SQL Agent Job to run at a certain time or interval. This is designed to report only servers with less than 20% free space but you can customize for your needs

Prerequisite:

If you have never used PowerShell on your system before, chances are that your PowerShell “Execution Policy” is set to restrict execution of scripts on your machine, and you’ll have trouble running this script. To allow your scripts to execute, you need to set your Execution Policy to RemoteSigned. Here is the procedure to, first of all, check what yours is set to, and then, if necessary, set it to RemoteSigned.

  • Run PowerShell as Administrator on your PC/Server
  • Enter in and run the Get-ExecutionPolicy cmdlet – this will output the current setting. If it is not alreadyRemoteSigned, or Unrestricted, then use the following cmdlet to set it to allow your scripts to run:Set-ExecutionPolicy RemoteSigned
  • You should now be asked to confirm whether you are sure. Cick Yes to confirm as shown below

1

Now that your environment is ready to run the cmdlets and scripts, lets take a look at the basic rundown of the script’s processes:

  1. Iterate through a list of servers you specify in a text file, checking disk space.
  2. Check each free disk space percentage figure against a pre-defined percent threshold figure.
  3. If the disk in question is below this threshold, then add the details to the report, if not, skip past it.
  4. Assemble an e-mail and send it off to the specified recipient(s) if any of the drives were below the free disk space threshold.

The Script


#########################################################
#
# SQLSERVERZEST: Server Disk Space monitoring Report
#
#########################################################
 
#### Provide Below email and SMTP details ####

$fromemail ="abc@email.com" 
$users="recipients@email.com"
$Server= "smptserver.DomainName.Com"

$computers = get-content -Path "//ServerName/../Servers.txt"  # Specify servers' list path


# Set free disk space threshold below in percent (default at 20%)
[decimal]$thresholdspace = 20
 

 #### Main Sctipt Block ####

$tableFragment= Get-CimInstance -ComputerName $computers cim_LogicalDisk -erroraction 'silentlycontinue' `
| select SystemName, DriveType, VolumeName, Name, @{n='Size (Gb)' ;e={"{0:n2}" -f ($_.size/1gb)}},@{n='FreeSpace (Gb)';e={"{0:n2}" -f ($_.freespace/1gb)}}, @{n='PercentFree';e={"{0:n2}" -f ($_.freespace/$_.size*100)}} `
| Where-Object {$_.DriveType -eq 3 -and [decimal]$_.PercentFree -lt [decimal]$thresholdspace} `
| ConvertTo-HTML -fragment 


#### HTML for our body of the email report ####

$HTMLmessage = @"
<font color=""Red"" face=""Segoe UI Light, Segoe UI Light"" size=""8"">
<u><b>Disk Space Storage Report</b></u>
<br>This report was generated because the drive(s) listed below have less than $thresholdspace% free space. Drives above this threshold will not be listed.
<br>
<style type=""text/css"">body{font: .8em ""Segoe UI Light"", Segoe UI Light, Segoe UI Light, Segoe UI Light, Segoe UI Light;}
ol{margin:0;padding: 0 1.5em;}
table{color:#FFF;background:#C00;border-collapse:collapse;width:647px;border:5px solid #900;}
thead{}
thead th{padding:1em 1em .5em;border-bottom:1px dotted #FFF;font-size:120%;text-align:left;}
thead tr{}
td{padding:.5em 1em;}
tfoot{}
tfoot td{padding-bottom:1.5em;}
tfoot tr{}
#middle{background-color:#900;}
</style>
<body BGCOLOR=""white"">
$tableFragment
</body>
"@
 
# Set up a regex search and match to look for any <td> tags in our body. These would only be present if the script above found disks below the threshold of free space.
# We use this regex matching method to determine whether or not we should send the email and report.
$regexsubject = $HTMLmessage
$regex = [regex] '(?im)<td>'
 
# if there was any row at all, send the email
if ($regex.IsMatch($regexsubject)) {
 send-mailmessage -from $fromemail -to $users -subject "Disk Space Monitoring Report" -BodyAsHTML -body $HTMLmessage -priority High -smtpServer $server
}
 
# End of Script

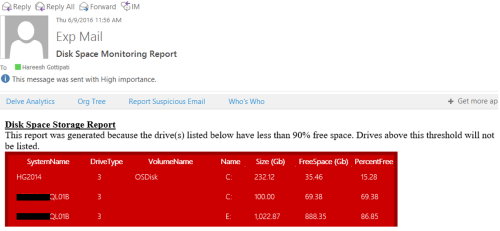
Here is the sample email report

2


This is just a quick report that I developed but as with any scripting language, PowerShell will give you plenty of customization to modify the look and feel of your report as desired.

Starting with SQL Server 2012, AlwaysOn Availability Groups provided group level high availability for any number of databases for multiple secondaries known as ‘replicas’. The secondary replicas allow direct read-only querying or can enforce connections that specify ‘ReadOnly’ as their Application Intent using the new feature called Read-Only routing which can be leveraged to scale out reporting workloads. However, in SQL Server 2012 and 2014 versions this redirection is only concerned with the first secondary replica defined in the priority list and all the read-only connections are routed only to that one replica by design. This restricts the other secondary replicas from participating in the load distribution process and thereby reducing the load balancing capability. This article provides you with the configuration and testing of read-only routing along with configuring a custom SQL Agent job in an attempt to create an improved load balancing effect.

Read-only routing refers to the ability of SQL Server to route incoming read-intent connection requests, which are directed to an availability group listener, to an available readable secondary replica. One of the pre-requisites to support read-only routing is that the availability replicas must be enabled for read access.

Tip: Use the below script to check if Read-Only Routing is already configured in your server

SELECT ag.name as "Availability Group", ar.replica_server_name as "When Primary Replica Is",
rl.routing_priority as "Routing Priority", ar2.replica_server_name as "RO Routed To",
ar.secondary_role_allow_connections_desc, ar2.read_only_routing_url
FROM sys.availability_read_only_routing_lists rl
             INNER JOIN sys.availability_replicas ar on rl.replica_id = ar.replica_id
             INNER JOIN sys.availability_replicas ar2 on rl.read_only_replica_id = ar2.replica_id
             INNER JOIN sys.availability_groups ag on ar.group_id = ag.group_id 
ORDER BY ag.name, ar.replica_server_name, rl.routing_priority 

To make it easy to understand, in this demo, we will use the below terminology:

  • Availability group named AG
  • Listener named AGLISTEN
  • Replicas SQL01A (primary) and SQL01B(secondary)

NOTE: Read-only routing can support ALLOW_CONNECTIONS property set to READ_ONLY or ALL (Graphically shown below)

0

Once the secondaries are set to readable (Read-Intent only/Yes), the below three steps are required to configure Read-Only Routing –

  1. Define a read-only routing URL
  2. Define a read-only routing List
  3. Update the client’s connection string to specify Application Intent connection property as ‘read-only’

Let’s take a look at the above steps in details.

1.   Configure Read-Only routing URL

A read_only_routing_url is the entry point of an application to connect to a readable secondary. It contains the system address or the port number that identifies the replica when acting as a readable secondary. This is similar to the endpoint URL we specify when configuring database mirroring. For each readable secondary replica that is to support read-only routing, you need to specify this routing URL

For example, define a URL SQL01B, so that when SQL01B is in the secondary role, it can accept read-only connections.

ALTER AVAILABILITY GROUP AG MODIFY REPLICA ON N'SQL01A' WITH (SECONDARY_ROLE (READ_ONLY_ROUTING_URL = N'TCP://SQL01A:1433'))
ALTER AVAILABILITY GROUP AG MODIFY REPLICA ON N'SQL01B' WITH (SECONDARY_ROLE (READ_ONLY_ROUTING_URL = N'TCP://SQL01B:1433'))

Tip: Use THIS code to generate routing URLs for each available secondary replicas to use in the above script


2.   Configure Read-Only routing List

For each replica that will act as primary, we need to define the corresponding secondary replicas that will act as the routing target for read-only workloads. This means that if the replica is acting as a primary, all read-only workloads will be redirected to the replicas in the read-only routing list. For example, when SQL01A is in the primary role, define our routing list to consist of SQL01B which is where read-only connection requests will be routed first and if it is not available or not synchronizing (Only in SQL Server 2012) connections will go to the next server in the list.

ALTER AVAILABILITY GROUP AG MODIFY REPLICA ON N'SQL01A' WITH (PRIMARY_ROLE (READ_ONLY_ROUTING_LIST= ('SQL01B', ‘SQL01A’))); 
GO 
ALTER AVAILABILITY GROUP AG MODIFY REPLICA ON N'SQL01B' WITH (PRIMARY_ROLE (READ_ONLY_ROUTING_LIST= ('SQL01A', ‘SQL01B’))); 

Tip: Alternatively to automate the above process you can use THIS script to dynamically generate the scripts required mentioned in the above tasks

Unfortunately there is no graphical user interface to perform these tasks in SSMS. The read-only routing URL and the routing list can be performed only through Transact-SQL or PowerShell

NOTE: As a best practice it is always recommended to assign the primary replica name at the end of the routing list separated by comma, in the rare event if all of the available secondary replicas are not available.

3.   Update client connection string

Read-only clients must direct their connection requests to this listener, and the client’s connection strings must specify the application intent as “read-only.” That is, they must be read-intent connection requests. This can be seen in the connection string, an example is shown below:

Server=tcp:aglisten,1433;Database=agdb1;IntegratedSecurity=SSPI;
ApplicationIntent=ReadOnly;MultiSubnetFailover=True

Before making client side changes you can confirm this newly configured read-only routing using SQL CMD by specifying application intent option (-K) as shown below

Sqlcmd –S AGLISTEN –E –d AGDB1 –K readonly

1

Load Balancing using Read-Only Routing List

The read-only routing introduced in SQL Server 2012 is used for redirection and offloading the read queries to the secondary replicas instead of primary replica. However, this redirection is only concerned with the first secondary replica defined in the priority list that we define. Since the primary replica strictly traverses the list and looks for the first replica that can serve the connection request. Once found, all subsequent read-only connections are routed to it. For example, in a multiple secondary architecture, all the read intent queries only hit the first secondary replica in the list while other secondaries do not participate in distributing this load. This limits the load balancing capability among other secondary replicas.

To overcome this situation here a workaround that will modify the Read-Only Routing list periodically to let read intent queries to use all the replicas at certain intervals (every 30 seconds in this case), so as to create a load balancing effect. This is only applicable to SQL Servers running 2012 and 2014 versions since starting with SQL Server 2016, Microsoft changed the game by introducing native load-balancing capabilities which we will look into later in the paper

WHILE 1=1
Begin
If (
SELECT ARS.role_desc
FROM SYS.availability_REPLICAs AR
join sys.dm_hadr_availability_REPLICA_states ARS ON AR.REPLICA_id = ARS.REPLICA_id
WHERE AR.REPLICA_server_name = (select @@SERVERNAME)
) = 'PRIMARY' and (select count(*) from sys.availability_read_ONly_routing_lists) &gt; 1
Begin
ALTER AVAILABILITY GROUP [AGDB1]
MODIFY REPLICA ON N'SQL01A' WITH (Primary_Role (READ_ONLY_ROUTING_LIST =('SQL01B','SQL01A')))
ALTER AVAILABILITY GROUP [AGDB1]
MODIFY REPLICA ON N'SQL01B' WITH (Primary_Role (READ_ONLY_ROUTING_LIST =('SQL01A','SQL01B')))
--print 'changing ROR URL in 30 seconds...'
WAITFOR DELAY '00:00:30'
--print 'Changing ROR URL'
--Run every 30 secONds
ALTER AVAILABILITY GROUP [AGDB1]
MODIFY REPLICA ON N'SQL01A' WITH (Primary_Role (READ_ONLY_ROUTING_LIST =('SQL01A','SQL01B')))
ALTER AVAILABILITY GROUP [AGDB1]
MODIFY REPLICA ON N'SQL01B' WITH (Primary_Role (READ_ONLY_ROUTING_LIST =('SQL01B','SQL01A')))

END
WAITFOR DELAY '00:00:30'
End

Note: You can add additional replica details based on the number of secondary replicas configured in your Read-Only Routing

To complete the procedure run the code from above in a new query window in SSMS for testing purposes and once verified you can then use the code to create a SQL agent job in all the replicas. This job needs to be run continuously on each replica. The code will only run from the instance that is in the PRIMARY role.

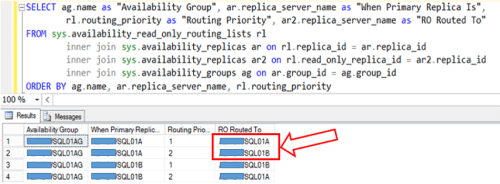
The verify the Read-Only Routing is rotating correctly run the below script

SELECT ag.name as "Availability Group", ar.replica_server_name as "When Primary Replica Is",
rl.routing_priority as "Routing Priority", ar2.replica_server_name as "RO Routed To"
FROM sys.availability_read_only_routing_lists rl
    INNER JOIN sys.availability_replicas ar on rl.replica_id = ar.replica_id
    INNER JOIN sys.availability_replicas ar2 on rl.read_only_replica_id = ar2.replica_id
    INNER JOIN sys.availability_groups ag on ar.group_id = ag.group_id
ORDER BY ag.name, ar.replica_server_name, rl.routing_priority

4

After 30 seconds, notice that the “RO Routed To” column alternates among the available secondary replicas.

4

As evident from above result, this code modifies Read-Only routing list bringing in a new secondary replica into play periodically to cater for the read intent connections essentially creating a load balancing effect. Load balancing using this technique provides a way to get even more use from server hardware that host secondary’s databases and provide reporting applications with better performance and throughput especially for long and resource intensive queries. Please note that this algorithm is limited but it serves the purpose quite effectively. A similar but much robust algorithm has been built into the native SQL engine starting with SQL Server 2016.