Feeds:
Posts
Comments

Registered servers is a great way to manage, categorize and access the SQL servers through SSMS and also one of the overlooked aspects. Registered servers are handy when you want to have all your servers at one place, sorted and categorized in various ways. With registered servers all your instances are just a click away eliminating the need to type the instance name every time you connect. Apart from the aforementioned uses of registered server I have put down other helpful scenarios where registered servers come in handy.

  • Easy to share among the team members and which is especially helpful for a newly hired DBA with import and export feature.
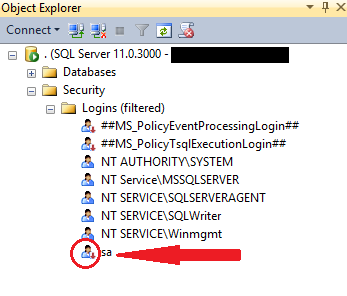
  • Does great job when you want to run a query on multiple servers in one query window. Either you want to check backups for all your production   instances or disable a built-in admin login from all your 2005 servers.
  • Helps to immediately identify servers’ availability after an outage.

Here are the steps to register individual servers using GUI

From the SSMS, open view and click on registered servers or Ctrl+Alt+G if you are feeling lucky 🙂

Reg ser 1

You will have an option of creating either a new group or a new server. Here I have chosen ‘New Server Registration’

Reg ser 2

As you can see here, server name is the actual name/ip address and Registered server name is what you like it to display.

Reg ser 3

I usually prefer the servers categorized based on the environment as shown below.

Reg ser 4

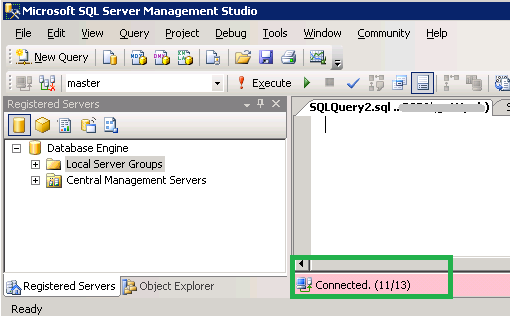
You can right click on any of the groups and open a new query window. That means, a query window is open to execute a query that gets the result from all the servers. The below screenshot shows the number of servers connected. This comes handy when you are checking the servers for connection issues.

Reg ser 5

Sure, there are hundreds of servers in an organization and adding a server one at a time is probably not a best way to go. This hints us to a way to add multiple entries at a time. Instead of reinventing the wheel again I found a great way to do this HERE

Technical Reviewer(s): Venkata Suresh Raavi; Jaipal Vajrala

Today morning when I was working on a huge database containing lots of LOB data, I was required to know what tables have LOB data, and the list of LOB columns by table name along with the data type.

I found that starting SQL Server 2005, we can easily retrieve this information from the Information Schema Views, by specifying “COLUMN_NAME” in view_name. There may be even a better way to do this, but here is what I came-up with.

USE [AdventureWorks2012]
GO
SELECT TABLE_SCHEMA, TABLE_NAME, COLUMN_NAME, DATA_TYPE
FROM INFORMATION_SCHEMA.COLUMNS 
WHERE DATA_TYPE IN ('FILESTREAM','XML','VARBINARY','TEXT','NTEXT','IMAGE') 
OR(DATA_TYPE IN ('VARCHAR', 'NVARCHAR') AND CHARACTER_MAXIMUM_LENGTH = -1)
ORDER BY TABLE_NAME

HERE is an explanation by Pinal Dave, why I have to include CHARACTER_MAXIMUM_LENGTH = -1 in the above query

Sample Output:

Untitled

Below column types are considered LOB (Large Objects):
VARCHAR(MAX), NVARCHAR(MAX), FILESTREAM, XML, VARBINARY,
TEXT, NTEXT, IMAGE

Note: Data types TEXT, NTEXT and IMAGE were deprecated in SQL Server 2012 and are going to be removed in future versions, so Microsoft doesn’t recommend using them in new applications. For more information, please refer HERE

Even though there are more pros than cons, Striping database backups are often overlooked by many DBAs. Based on my observations in our environment, striping can significantly benefit larger database backups (~500+ GB).

As shown in the picture below, striping is nothing but splitting one backup file to multiple backup files (maximum 64 files). However, these files may or may not be the same size (depends on the storage disks IO).

Striped Backups

By Striping a backup we can:

  • Increase backup throughput and reduce the backup time window
  • Allow backups & restores to be written or to be read from all devices in parallel
  • Enable backup to different disks, thus distribute the space usage

Below are the simple T-SQL backup commands using AdventureWorks2012 sample database as an example.

T-SQL command for Striping a database backup

Note: In the below script, I used only Disk C to contain all the striped .bak files. However, we can  direct to multiple disks if required

-- Striped Backups -- Backup to multiple files - 4 files in this case
BACKUP DATABASE [AdventureWorks2012]
TO 
DISK='C:\AdventureWorks2012_1.bak', 
DISK='C:\AdventureWorks2012_2.bak', 
DISK='C:\AdventureWorks2012_3.bak',
DISK='C:\AdventureWorks2012_4.bak'
WITH STATS = 10
GO

T-SQL command to restore from Striped database backup 

--Restoring from striped backup -- from multiple files
RESTORE DATABASE [AdventureWorks2012] 
FROM  
DISK='C:\AdventureWorks2012_1.bak', 
DISK='C:\AdventureWorks2012_2.bak', 
DISK='C:\AdventureWorks2012_3.bak',
DISK='C:\AdventureWorks2012_4.bak'
WITH STATS = 10 
GO

Also, we can apply the same striping concept on Log backups. Below is how we do it

T-SQL command for Striping transaction log backup

--Striped Log backup
BACKUP LOG [AdventureWorks2012]
TO
DISK='C:\AdventureWorks2012_1.trn', 
DISK='C:\AdventureWorks2012_2.trn', 
DISK='C:\AdventureWorks2012_3.trn',
DISK='C:\AdventureWorks2012_4.trn'
WITH STATS = 10
GO

Demo: Normal Backup Vs Striped Backup

Below are the results and screenshots from a live production environemnt. This once again proves striping backup files increase data transfer rate and reduce the time to backup

Results:

Backup Type Time to Backup Data Transfer Rate
Normal Backup (1 File) 537.6 Seconds 111.9 MB/Sec
Striped Backup (4 Files) 201.0 Seconds 299.3 MB/Sec

Screenshots:

StripedBackupDemo_1of2

StripedBackupDemo_2of2

However, the major downside of striping a backup is that if at-least one backup file is corrupt, restore operation cannot be performed using the other files.

Also, HERE is why I haven’t discussed striping backups using SSMS GUI.

Technical Reviewer(s): Hareesh Gottipati; Jaipal Vajrala

Ever noticed and wondered why the well-known SQL Server system administrator (sa) login is in a disabled state?

SA Login

The reason is simple, sa login account is disabled out of the box (by default) in Windows Authentication mode. You have to enable manually to use it.

On the other hand, if you request Mixed Mode Authentication during installation, SQL Server Setup prompts you to set an sa login password. So sa login account is enabled in this case.

Enable/Disable sa login using SSMS GUI:

  • From the Object Explorer, expand “Security” and then expand “Logins” –> Right click on sa and select “Properties”

SA Login - 1

  • On the “General” tab, create a strong password

SA Login - 2

  • On the “Status” tab, click “Enabled”, and then click “ok” (If sa is already enabled, you have to chose “Disabled” to disable the same)

SA Login - 3

Enable sa login using T-SQL script:

ALTER LOGIN sa ENABLE ;
GO
ALTER LOGIN sa WITH PASSWORD = '$trongPa$$w@rD';
GO

Disable sa login using T-SQL script:

ALTER LOGIN sa DISABLE ;
GO

Here’s some more info about “sa” account:

  • System administrator (sa) is a special login provided for backward compatibility
  • Usually there is no effect sa being in a disabled state though it pertains and owns the system databases
  • By default, sa login is assigned to the sysadmin fixed server role and cannot be changed
  • Microsoft do not recemmond using sa login in application (as it is often targeted by malicious users)
  • However, Microsoft recommonds using sa only when there is no other way to log in to an instance
  • The sa login cannot be removed/deleted

Technical Reviewer: Jaipal Vajrala

Most of the DBAs at some point of time in their career should have faced at-least one of the below situation(s):

1. The disk/SAN where the database files are located is going to be replaced
2. Disk is full and no more free space available
3. Data files and/or log files are not located on standard drives

There can be even more secnarios like the above where we may need to move the database files from current location to a new location. Starting SQL Server 2005 this can be simply achieved by using ALTER DATABASE T-SQL command

Let us take the below scenario for step-by-step Demo:

Database: AdventureWorks2012
Current Files Location: C:\Disk1
New\Target Files Location: C:\Disk2

Step 1: Get the current database files Logical Name and Physical Location

USE master
GO
SELECT name AS LogicalFileName, physical_name AS FileLocation
, state_desc AS Status 
FROM sys.master_files 
WHERE database_id = DB_ID('AdventureWorks2012');
1

Step 2: Take the Database offline

USE master
GO
ALTER DATABASE AdventureWorks2012 SET OFFLINE WITH ROLLBACK IMMEDIATE
GO

2

Note: In the above T-SQL query, I used WITH ROLLBACK IMMEDIATE option. Please be careful when using this option as it rolls back those incomplete transactions immediately. You may exclude this option, but have to wait till all the transactions are committed to take the database offline.

Step 3: Move the database files physically in the Windows OS to the new location

3

4

Step 4: Use ALTER DATABASE to modify the FILENAME to new location for every file moved

Only one file can be moved at a time using ALTER DATABASE.

USE master
GO
ALTER DATABASE AdventureWorks2012
MODIFY FILE 
( NAME = AdventureWorks2012_Data, 
FILENAME = 'C:\Disk2\AdventureWorks2012_Data.mdf'); -- New file path

USE master
GO
ALTER DATABASE AdventureWorks2012 
MODIFY FILE 
( NAME = AdventureWorks2012_Log, 
FILENAME = 'C:\Disk2\AdventureWorks2012_log.ldf'); -- New file path
5

Step 5: Set the database ONLINE

USE master
GO
ALTER DATABASE AdventureWorks2012 SET ONLINE;

Step 6: Now, verify the database files Physical location

USE master
GO
SELECT name AS FileName, physical_name AS CurrentFileLocation, state_desc AS Status 
FROM sys.master_files 
WHERE database_id = DB_ID('AdventureWorks2012');
6

Note: Same method can be used for moving files for any system or user defined database except for Resource database files

Cleaning/deleting the old backup files is equally important as taking the backups. Doing so we can (i) Avoid overhead cost for the storage space, and (ii) Ensure and retain enough space on the disk for the next successful backup

Using ‘Maintenance Plans’ this task will be a cake walk for the DBAs who are having hard time deleting the old backup files manually!

Below is the step by step process with screenshots showing how to setup and Automate backup files cleanup task using Maintenance Plans in SQL Server.

Step 1: Connect to the SQL Server instance, expand ‘Management’ folder, right click on ‘Maintenance Plans’ and select ‘Maintenance Plan Wizard’

BackUp Clean - 1

Step 2: ‘Maintenance Plan Wizard’ pops out, click Next

BackUp Clean - 2

Step 3: On the ‘Maintenance Plan Wizard’ give a Name and Description. To schedule this as a job, select Change under ‘Schedule’

BackUp Clean - 3

Step 4: ‘New Job Schedule’ pops out. Define a schedule. In my case I gave it to run Daily at 12:00:00 AM. Click ‘ok’ when done.

BackUp Clean - 4

Step5: Make sure everything is correct and click Next

BackUp Clean - 5

Step 6: Select the Maintenance Cleanup Task option and click Next

BackUp Clean - 6

Step7: Here we only have one task, so nothing to order/re-order. Click Next

BackUp Clean - 7

Step 8: This window is the heart for this task. Under ‘Delete files of the following type’ select Backup files. Under ‘File location’ select Search folder and delete files based on an extension. Give the path of the backup files location in Folder and “bak” (for native backups) in File extension. For Light Speed Backups you need to mention ‘lsb’.

Under ‘File age’ check the option Delete files based on the age of the file at task run time. Under ‘Delete files older than the following’ select a retention policy. I left the default 4 weeks. Click Next

BackUp Clean - 8

Step 9: The wizard will write a report to a text file to the defined Folder location. You can leave the default location or chose a location of your choice. Click Next

BackUp Clean - 9

Step 10: Click Finish

BackUp Clean - 10

This should create the Maintenance Plan ‘Delete old backup files’ as shown in the screenshot below

BackUp Clean - 11

Note: SQL Agent Services must be running in order to execute the above discussed Maintenance Plan.

Earlier today I was required to pull the list of all SQL Login Accounts, Windows Login Accounts and Windows Group Login Accounts (basically all the Logins along with the Account Type of the Login) on one of the SQL Server instance where there are close to a hundred Login Accounts existing.

Doing it from SSMS GUI will take forever. So, I wrote a simple T-SQL script using which I was able to pull out all that information in less than a second!

Get the list of all Login Accounts in a SQL Server

SELECT name AS Login_Name, type_desc AS Account_Type
FROM sys.server_principals 
WHERE TYPE IN ('U', 'S', 'G')
and name not like '%##%'
ORDER BY name, type_desc

Get the list of all SQL Login Accounts only

SELECT name
FROM sys.server_principals 
WHERE TYPE = 'S'
and name not like '%##%'

Get the list of all Windows Login Accounts only

SELECT name
FROM sys.server_principals 
WHERE TYPE = 'U'

Get the list of all Windows Group Login Accounts only

SELECT name
FROM sys.server_principals 
WHERE TYPE = 'G'

Note: Requires ALTER ANY LOGIN server permission to be able to view all the logins.

One of the first things I did when I began my journey with SQL Server was installing a sample database. Though it seems to be very simple now, but not really when I just started leaning database. So, this post will be helpful for friends wanting to start their career in SQL Server or as a junior DBA.

Even though there exists quite a few sample databases like AdventureWorks, Northwind, Pubs..etc, in this post I will focuss only on AdventureWorks, since starting SQL Server 2008, Microsoft discontinued support for the Northwind and pubs sample databases. Moreover, AdventureWorks is the Microsoft’s official sample database for later versions of SQL Server.

     1. Where to look for downloading SQL Server sample databases

Microsoft’s CodePlex.com is the start to download official sample databases. Browse to http://sqlserversamples.codeplex.com and look/search for your desired sample database OR alternatively you can directly navigate to http://msftdbprodsamples.codeplex.com for AdventureWorks sample database.

     2. How to find the “right” AdventureWorks sample database

If you are a newbie, this can be really confusing. There are sample databases for different environments and various versions. You can chose a download based on:

  • Version (2012, 2008R2, 2008)
  • Environment (OLTP, DW, Azure)
  • Full or LT (LT-Light version is a simplified and smaller sample database)

Below are the direct download links from CodePlex.com. You can either download a zip file (recommended for beginners) or Data file by selecting the “right” link below.

Click on your choice of AdventureWorks and save the download.

OLTP Environment – Zip file (contains both data and log files)
AdventureWorks2012_Database.zip
AdventureWorksLT2012_Database.zip
AdventureWorks2008R2_Database.zip
AdventureWorksLT2008R2_Database.zip
AdventureWorks2008_Database.zip
AdventureWorksLT2008_Database.zip
OLTP Environment – Data Files (contains only data file)
AdventureWorks2012 Data File
AdventureWorksLT2012_Data
AdventureWorks2008R2 Data File
AdventureWorks 2008R2 LT Data File
DW Environment – Data Files (contains only data file)
AdventureWorksDW2012 Data File
AdventureWorksDW2008R2 Data File
Azure Environment Zip file (contains both data and log files)
AdventureWorks2012ForWindowsAzureSQLDatabase.zip
AdventureWorks2008R2AZ.zip

     3. How to attach the AdventureWorks sample database

This varies a little depending on your download file type. If you have either downloaded

  • Zip file (contains both data and log file) OR
  • Data file (contains only data file)

I have seen people having issues due to the download type. So, I will cover both here.

Attaching a database using T-SQL script:

If using zip file download (contains both data and log file)

Use Master
GO
CREATE DATABASE AdventureWorks2012 
ON (FILENAME = 'C:\SampleDB\AdventureWorks2012_Data.mdf'), -- Data file path
(FILENAME = 'C:\SampleDB\AdventureWorks2012_Log.ldf') -- Log file path
FOR ATTACH;

If using Data file download (contains only Data file)

Use Master
GO
CREATE DATABASE AdventureWorks2012 
ON (FILENAME = 'C:\SampleDB\AdventureWorks2012_Data.mdf') -- Data file path
FOR ATTACH;

Attaching a database using SSMS GUI:

  1. If you downloaded the Zip file, unzip the database, it should have data file and log file – move them to your desired location. Else, if you downloaded the Data file, nothing to unzip, just move the Data file to the desired location
  2. From the SSMS GUI, connect to SQL Server Instance where you want to attach this sample database
  3. Right click on “Databases” and select “Attach…”
  4. “Attach Databases” dialog window pops out – Click on the “Add” button
  5. “Locate Database Files” dialog window pops out – Locate the AdventureWorks data file and click “ok”
  6. If you are attaching from the zip file download which contains both data file and log file go to step 7. Else, if you are attaching from the Data file – select the log file and click “Remove”
  7. Click “ok” on the “Attach Databases” dialog window
  8. You can find the new AdventureWorks database attached under “Databases”

Below is the video tutorial on how to attach a database using SSMS GUI

Technical Reviewer: Jaipal Vajrala

From a recent conversation with a customer, I noticed even some of the experienced DBAs are not very clear about the terms “unallocated space” and “unused space” and by doing a quick Bing search, found there are many SQL friends out there trying to get a clear correlation between these SQL Server terms: unallocated space, unused space, and reserved.

Today, let us try to get a clear picture (infact, a picture!) of these terms using sp_spaceused system stored procedure and at the same time understanding results for database size information.

Execute the below query on AdventureWorks2012 sample database

USE [AdventureWorks2012]
GO
EXEC sp_spaceused
GO

Results:

sp_spaceused

Now, let us understand the above result sets, lets check by the column names

  • database_size: database size (data files + log files) = 205.75 MB
  • unallocated space: space that is not reserved for use by database objects (Space Available) = 14.95 MB
  • reserved: space that is reserved for use by database objects = 190.05 MB
  • data: total space used by data = 97016 KB/1024 = 94.74 MB
  • index_size: total space used by indexes = 88048 KB/1024 = 85.99 MB
  • unused: portion of the reserved space, which is not yet used = 9544 KB/1024 = 9.32 MB
  • used:  let us coin this word to simplify things. say used = data + index_size = 94.74 + 85.99 = 180.73 MB

We now know what these columns are and the numbers they are returning. But, here is the real confusion part: How are they correlated with each other?

To answer this, below is the simple formulae I came up with to better interpret the results.  I haven’t found this simple explanation clearly anywhere else on SQL space (trust me, you won’t)

(color coded to read easy)

used = data + index_size
reserved = used unused
database_size = reserved + unallocated space + log space

To cross verify, we can substitute the result set we got from AdventureWorks2012 database in the above formula and confirm by checking the log file size. Alternatevely, we can calculate the log file size, which is not returned from the ‘sp_spaceused’ result set.

180.73 94.74 + 85.99 –>TRUE
190.05 180.43 9.32 –> TRUE
205.75 = 190.05 14.95 + log space

Hence log space = 205.75(190.05+14.95) = 0.75 MB (which is right!)

And, below is my small art in the same color coding as above to illustrate in a picture format. Of course, who doesn’t love pictures, and I am no exception -:)

Suresh Raavi - Copy Right

By default, SQL Server automatically assigns a value to the Identity Column for each new row inserted into the table. However, if desired, we can insert explicit values into the Identity column when IDENTITY_INSERT property is set to ON.

Let us take an example from AdventureWorks2012 database. Table [HumanResources].[Department] is having DepartmentID as Identity column.

Now, if we want to insert a value into the DepartmentID which is an Identity column, we can achieve this by:

--Turning ON the IDENTITY_INSERT property
SET IDENTITY_INSERT [HumanResources].[Department] ON
GO

--Now insert a sample row into table with DepartmentID = 1001
INSERT INTO [HumanResources].[Department] (DepartmentID, Name, GroupName, 
ModifiedDate) -- MUST to specify the Identity column name 
VALUES (1001, 'SureshRaavi', 'Operations', GetDate())
GO

--Don't forget to turn OFF the IDENTITY_INSERT
SET IDENTITY_INSERT [HumanResources].[Department] OFF
GO

Note:
If we try inserting values without turning ON the IDENTITY_INSERT, we will encounter the below error message:
Msg 544, Level 16, State 1, Line 1
Cannot insert explicit value for identity column in table ‘Department’ when IDENTITY_INSERT is set to OFF.

However, only one table in a session can have the IDENTITY_INSERT property set to ON at any time. And, user must own the table or have ALTER permission on the table in order to do this.

Design a site like this with WordPress.com
Get started