Feeds:
Posts
Comments

Posts Tagged ‘SQL Server 2008 R2’

Earlier today I was required to pull the list of all SQL Login Accounts, Windows Login Accounts and Windows Group Login Accounts (basically all the Logins along with the Account Type of the Login) on one of the SQL Server instance where there are close to a hundred Login Accounts existing.

Doing it from SSMS GUI will take forever. So, I wrote a simple T-SQL script using which I was able to pull out all that information in less than a second!

Get the list of all Login Accounts in a SQL Server

SELECT name AS Login_Name, type_desc AS Account_Type
FROM sys.server_principals 
WHERE TYPE IN ('U', 'S', 'G')
and name not like '%##%'
ORDER BY name, type_desc

Get the list of all SQL Login Accounts only

SELECT name
FROM sys.server_principals 
WHERE TYPE = 'S'
and name not like '%##%'

Get the list of all Windows Login Accounts only

SELECT name
FROM sys.server_principals 
WHERE TYPE = 'U'

Get the list of all Windows Group Login Accounts only

SELECT name
FROM sys.server_principals 
WHERE TYPE = 'G'

Note: Requires ALTER ANY LOGIN server permission to be able to view all the logins.

Advertisement

Read Full Post »

One of the first things I did when I began my journey with SQL Server was installing a sample database. Though it seems to be very simple now, but not really when I just started leaning database. So, this post will be helpful for friends wanting to start their career in SQL Server or as a junior DBA.

Even though there exists quite a few sample databases like AdventureWorks, Northwind, Pubs..etc, in this post I will focuss only on AdventureWorks, since starting SQL Server 2008, Microsoft discontinued support for the Northwind and pubs sample databases. Moreover, AdventureWorks is the Microsoft’s official sample database for later versions of SQL Server.

     1. Where to look for downloading SQL Server sample databases

Microsoft’s CodePlex.com is the start to download official sample databases. Browse to http://sqlserversamples.codeplex.com and look/search for your desired sample database OR alternatively you can directly navigate to http://msftdbprodsamples.codeplex.com for AdventureWorks sample database.

     2. How to find the “right” AdventureWorks sample database

If you are a newbie, this can be really confusing. There are sample databases for different environments and various versions. You can chose a download based on:

  • Version (2012, 2008R2, 2008)
  • Environment (OLTP, DW, Azure)
  • Full or LT (LT-Light version is a simplified and smaller sample database)

Below are the direct download links from CodePlex.com. You can either download a zip file (recommended for beginners) or Data file by selecting the “right” link below.

Click on your choice of AdventureWorks and save the download.

OLTP Environment – Zip file (contains both data and log files)
AdventureWorks2012_Database.zip
AdventureWorksLT2012_Database.zip
AdventureWorks2008R2_Database.zip
AdventureWorksLT2008R2_Database.zip
AdventureWorks2008_Database.zip
AdventureWorksLT2008_Database.zip
OLTP Environment – Data Files (contains only data file)
AdventureWorks2012 Data File
AdventureWorksLT2012_Data
AdventureWorks2008R2 Data File
AdventureWorks 2008R2 LT Data File
DW Environment – Data Files (contains only data file)
AdventureWorksDW2012 Data File
AdventureWorksDW2008R2 Data File
Azure Environment Zip file (contains both data and log files)
AdventureWorks2012ForWindowsAzureSQLDatabase.zip
AdventureWorks2008R2AZ.zip

     3. How to attach the AdventureWorks sample database

This varies a little depending on your download file type. If you have either downloaded

  • Zip file (contains both data and log file) OR
  • Data file (contains only data file)

I have seen people having issues due to the download type. So, I will cover both here.

Attaching a database using T-SQL script:

If using zip file download (contains both data and log file)

Use Master
GO
CREATE DATABASE AdventureWorks2012 
ON (FILENAME = 'C:\SampleDB\AdventureWorks2012_Data.mdf'), -- Data file path
(FILENAME = 'C:\SampleDB\AdventureWorks2012_Log.ldf') -- Log file path
FOR ATTACH;

If using Data file download (contains only Data file)

Use Master
GO
CREATE DATABASE AdventureWorks2012 
ON (FILENAME = 'C:\SampleDB\AdventureWorks2012_Data.mdf') -- Data file path
FOR ATTACH;

Attaching a database using SSMS GUI:

  1. If you downloaded the Zip file, unzip the database, it should have data file and log file – move them to your desired location. Else, if you downloaded the Data file, nothing to unzip, just move the Data file to the desired location
  2. From the SSMS GUI, connect to SQL Server Instance where you want to attach this sample database
  3. Right click on “Databases” and select “Attach…”
  4. “Attach Databases” dialog window pops out – Click on the “Add” button
  5. “Locate Database Files” dialog window pops out – Locate the AdventureWorks data file and click “ok”
  6. If you are attaching from the zip file download which contains both data file and log file go to step 7. Else, if you are attaching from the Data file – select the log file and click “Remove”
  7. Click “ok” on the “Attach Databases” dialog window
  8. You can find the new AdventureWorks database attached under “Databases”

Below is the video tutorial on how to attach a database using SSMS GUI

Technical Reviewer: Jaipal Vajrala

Read Full Post »

From a recent conversation with a customer, I noticed even some of the experienced DBAs are not very clear about the terms “unallocated space” and “unused space” and by doing a quick Bing search, found there are many SQL friends out there trying to get a clear correlation between these SQL Server terms: unallocated space, unused space, and reserved.

Today, let us try to get a clear picture (infact, a picture!) of these terms using sp_spaceused system stored procedure and at the same time understanding results for database size information.

Execute the below query on AdventureWorks2012 sample database

USE [AdventureWorks2012]
GO
EXEC sp_spaceused
GO

Results:

sp_spaceused

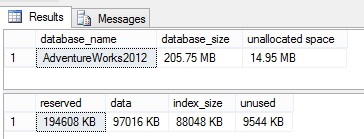
Now, let us understand the above result sets, lets check by the column names

  • database_size: database size (data files + log files) = 205.75 MB
  • unallocated space: space that is not reserved for use by database objects (Space Available) = 14.95 MB
  • reserved: space that is reserved for use by database objects = 190.05 MB
  • data: total space used by data = 97016 KB/1024 = 94.74 MB
  • index_size: total space used by indexes = 88048 KB/1024 = 85.99 MB
  • unused: portion of the reserved space, which is not yet used = 9544 KB/1024 = 9.32 MB
  • used:  let us coin this word to simplify things. say used = data + index_size = 94.74 + 85.99 = 180.73 MB

We now know what these columns are and the numbers they are returning. But, here is the real confusion part: How are they correlated with each other?

To answer this, below is the simple formulae I came up with to better interpret the results.  I haven’t found this simple explanation clearly anywhere else on SQL space (trust me, you won’t)

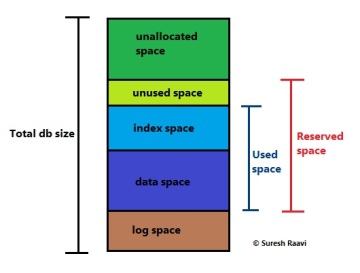
(color coded to read easy)

used = data + index_size
reserved = used unused
database_size = reserved + unallocated space + log space

To cross verify, we can substitute the result set we got from AdventureWorks2012 database in the above formula and confirm by checking the log file size. Alternatevely, we can calculate the log file size, which is not returned from the ‘sp_spaceused’ result set.

180.73 94.74 + 85.99 –>TRUE
190.05 180.43 9.32 –> TRUE
205.75 = 190.05 14.95 + log space

Hence log space = 205.75(190.05+14.95) = 0.75 MB (which is right!)

And, below is my small art in the same color coding as above to illustrate in a picture format. Of course, who doesn’t love pictures, and I am no exception -:)

Suresh Raavi - Copy Right

Read Full Post »

By default, SQL Server automatically assigns a value to the Identity Column for each new row inserted into the table. However, if desired, we can insert explicit values into the Identity column when IDENTITY_INSERT property is set to ON.

Let us take an example from AdventureWorks2012 database. Table [HumanResources].[Department] is having DepartmentID as Identity column.

Now, if we want to insert a value into the DepartmentID which is an Identity column, we can achieve this by:

--Turning ON the IDENTITY_INSERT property
SET IDENTITY_INSERT [HumanResources].[Department] ON
GO

--Now insert a sample row into table with DepartmentID = 1001
INSERT INTO [HumanResources].[Department] (DepartmentID, Name, GroupName, 
ModifiedDate) -- MUST to specify the Identity column name 
VALUES (1001, 'SureshRaavi', 'Operations', GetDate())
GO

--Don't forget to turn OFF the IDENTITY_INSERT
SET IDENTITY_INSERT [HumanResources].[Department] OFF
GO

Note:
If we try inserting values without turning ON the IDENTITY_INSERT, we will encounter the below error message:
Msg 544, Level 16, State 1, Line 1
Cannot insert explicit value for identity column in table ‘Department’ when IDENTITY_INSERT is set to OFF.

However, only one table in a session can have the IDENTITY_INSERT property set to ON at any time. And, user must own the table or have ALTER permission on the table in order to do this.

Read Full Post »

As of today (5/14/2013) this MSDN article says “SQL Server Agent service startup account must be a member of the SQL Server sysadmin fixed server role”

However, in one of our environments (SQL 2012) I have seen, just a public fixed server role is good enough to start the SQL Agent services and it works very well.

So is the statement mentioned in the MSDN article incorrect? looks like it is..moreover later I figured out the account (either a domain account or built-in system account) used for running any of the SQL Server services may not necessarily have a SQL login at all…sounds interesting?

Before going further on this topic let’s first understand What is a Per-Service SID?

SQL 2008 introduced this new option of SID (Security Identifier), a mechanism that assigns privileges to the SQL service itself, rather than to the account under which the service runs.

So starting SQL Server 2008+ on Windows Server 2008+ here is how Service Configuration and Access Control is managed:

  • SQL Server enables per-service SID for each of its services to provide service isolation and defense in depth
  • This per-service SID is derived from the service name (e.g. Database Engine/SQL Server Agent/SSIS/SSRS..etc) and is unique to that service
  • For example, a service SID name for the Database Engine service might be NT Service\MSSQL$<InstanceName>

Service SIDs managed to improve our security because:

  • Service isolation enables access to specific objects without the need to run a high-privilege account or weaken the security protection of the object
  • By using an access control entry that contains a service SID, a SQL Server service can restrict access to its resources

And here’s my understanding after some research

  • The account (either a domain account or built-in system account) used for running SQL Server services may not necessarily have a SQL login if the Per Service SID has a login instead
  • SQL Server DB Engine and SQL Server Agent runs as Windows services named NT SERVICE\MSSQLSERVER and NT SERVICE\SQLSERVERAGENT respectively within the Windows environment.
  • And the Service Account which we specify to run the services will be used when a process tries to reach outside of the current Windows environment.
  • Hence, the Service Startup Account will be used for off-box operations, unless it’s a built-in account like Network Service or a Virtual Account and if the server is Domain-joined, in which case the Machine Account will be used.
  • On SQL 2012 separate Service Startup account can be eliminated and the SQL Services can run as the “Virtual Accounts”, which have the same name as the Per Service SID, but which also have a system-managed password.

Always remember SQL Server Secuirty is all about Principle of Least Privilege. For more specific information refer MSDN BOL: Configure Windows Service Accounts and Permissions

Read Full Post »

One of the Microsoft’s recommendation for optimizing the tempDB performance is to make each tempdb data file the same size.

Today, on one of our servers, I noticed there are 13 data files with different sizes as shown in the below screenshot:

tempdb1

My target here is to configure tempdb with 8 equi sized data files and one log file. So, in this case I have to delete those 5 extra data files and re-size the remaining 8 files equally.

To achieve this I followed the below simple three step process (The same procedure can be applied to any user databases as well)

-- Step1: First empty the data file
USE tempdb
GO
DBCC SHRINKFILE (tempdev12, EMPTYFILE); -- to empty "tempdev12" data file
GO

Data file won’t gets deleted unless it is empty. So before going to Step2 to delete the data file, we should first empty the data file which can be done from the Step1 above.

Note: If encountered this error Msg 2555, Level 16, State 1, Line 1 while performing the above operation, please refer to this post –> Msg 2555, Level 16, State 1, Line 1 – Error DBCC SHRINKFILE with EMPTYFILE option

--Step2: Remove that extra data file from the database
ALTER DATABASE tempdb
REMOVE FILE tempdev12; --to delete "tempdev12" data file
GO

I repeated the above two steps to delete the other files as well. Below is the screenshot after deleting the extra files

tempdb2

--Step3: Re-size the data files to target file size 
-- Use ALTER DATABASE if the target file size is greater than the current file size
USE [master]
GO
ALTER DATABASE [tempdb] 
MODIFY FILE ( NAME = N'tempdev', SIZE = 3072000KB ) --grow to 3000 MB
GO
--Use DBCC SHRINKFILE if the target file size is less than the current file size
USE [tempdb]
GO
DBCC SHRINKFILE (N'tempdev' , 3000) --shrink to 3000 MB
GO

In my case, the target file size is 3000 MB which is greater than the current file size, so I ran the ALTER DATABASE command for all the 8 files. And below is the screenshot after re-sizing the files

tempdb3

Note: The same procedure can be used for removing extra log files as well. Make sure the log file you are trying to empty do not have any active portion of the log. Run DBCC LOGINFO on your specified database, taking note of the FileId and the Status indicator (2 showing that it is an active VLF)

Read Full Post »

Often times I keep checking the error log to make sure if everything is running fine. Here is an undocumented stored procedure that really helps simplify our task of searching the error log.

Exec XP_ReadErrorLog
GO

This proc has 4 parameters:

  • Parameter 1 (int), is the number of the log file you want to read, default is “0” for current log.
  • Parameter 2 (int), value of 1 reads SQL error logs, value of 2 reads SQL Server Agent logs, default is 1.
  • Parameter 3 varchar (255), is a search string for the log entry, with a default value of NULL.
  • Parameter 4 varchar (255), is another search string for the log entry, with a default value of NULL.

Example searchings:

Exec XP_ReadErrorLog 0
Exec XP_ReadErrorLog 0, 1
Exec XP_ReadErrorLog 0, 1, 'deadlock'
Exec XP_ReadErrorLog 0, 1, 'deadlock', 'MDW'

Update 01/21/2014:


If you are using 2012 SQL Servers, the above might not work, if so please try below

Exec XP_ReadErrorLog 0, 1, "deadlock" (OR)
Exec Master..SP_ReadErrorLog 0, 1, 'deadlock'


Read Full Post »

When an error is raised by the SQL Server Database Engine, we usually see the Severity Level as in the below example:

Msg 5184, Level 16, State 2, Line 1

The severity level of the error indicates the type of problem encountered by SQL Server. Hence looking at the Level we can get a quick idea of what the error is about and if it can be fixed by the user or not.

Below is the table where I tried to put all the Severity Levels in Brief:

Severity level Description
00 – 10 Informational messages – not severe
11  – 16 Indicate errors that can be corrected by the user
17 – 19 Indicate software errors that cannot be corrected by the user. Inform Sys Admin
20 – 24 Indicate system problems and are fatal errors

For more information and for a full table listing Levels of Severity, please refer MSDN BOL

Read Full Post »

Here is a typical scenario every SQL Server DBA faces:  Transaction Log grows unexpectedly or becomes full!!

So, do I need to increase the Log size? Fortunately we have a better solution – SHRINK the log file!

Typically log truncation frees space in the log file for reuse by the Transaction Log thus releasing space and making it not to over grow in size. This truncation occurs automatically when:

  • Database is backed up – under Simple recovery model
  • Transaction log is backed up – under Full recover model

When the database is in simple recovery mode I usually don’t expect the T-log to be blowing out. This happened to me and I figured out this is because of increasing number of uncommitted transactions!

In this case I am running a purge job to purge data from a management data warehouse (MDW) database (about 1600+ GB) which is configured to receive data from multiple instances as part of the MDW Data Collection configuration setup. And below is what I did to overcome this problem.

First I checked the log size and log space used% for every database using the following DBCC command:

DBCC SQLPERF(LogSpace)

After getting to know the log size (around 900+ GB), I shrinked it using the below command to some 800+ MB

USE DatabaseName;
GO
--Truncate the log by changing the database recovery model to SIMPLE 
--(If it?s not already in SIMPLE recovery model)
ALTER DATABASE DatabaseName
SET RECOVERY SIMPLE;
GO
--Shrink the truncated log file to 1 MB 
--(However it won?t shrink a file past the size needed to store the data in the file)
DBCC SHRINKFILE (DatabaseName_Log, 1);
GO
--Reset the database recovery model.
ALTER DATABASE DatabaseName
SET RECOVERY FULL;
GO

Shrinking occurs only when at least one virtual log file (VLF) is free, which means in my case I have tons of inactive VLFs as I am able to shrink it to 800 MB from 900 GB! (amazing isn’t it?)

Please refer BOL for the options above. Also, this can be done using GUI by right clicking on database ->Tasks->Shrink->Files

Here is more information from MSDN BOL:

Read Full Post »

When tried to empty one of the tempdb data file using the below T-SQL command:

(My goal here is to REMOVE the file using ALTER DATABASE command followed by. For more information on removing data/log files, please refer to this post How to Best Remove Extra TempDB Data Files and Log Files)

--To empty 'tempdev12' data file
USE tempdb
GO
DBCC SHRINKFILE (tempdev12, EMPTYFILE); 
GO

I got the below error message:

DBCC SHRINKFILE: Page 9:44720 could not be moved because it is a work table page. Msg 2555, Level 16, State 1, Line 1 Cannot move all contents of file “tempdev12” to other places to complete the emptyfile operation. DBCC execution completed. If DBCC printed error messages, contact your system administrator.

I figured out this is due to the existing connections and existing temp tables. To avoid this we can either

  • Kill all the existing connections to the database OR
  • Re-start the SQL Server

In may case it is not a critical production instance,  so I just restarted the server and it worked.

For more information on how to use SHRINKFILE command please visit my previous post Transaction Log is Full – How to Shrink the Transaction Log

Read Full Post »

« Newer Posts - Older Posts »